The D5500 is the successor of the D5300 released in 2013
(another numbering might have invited confusion with the popular "Nikon 5400"; which is how the
Coolpix 5400 came to be known, back in 2003).
Predecessor of the D5600.
Nikon DX Photography Technical Review
of a Full System: Camera, Lenses, Accessories...
Camera manufacturers use different names for the same feature.
Here are the abbreviations used by Nikon and the names prevalent in the Nikon Universe :
Symbol
Meaning
FX
Full-frame (FF).
Designed for an image sensor of 24mm by 36mm
(2015-05-22, 2017-01-09) 4 lines of Nikon crop-sensor DSLR bodies :
Buyer's Guide (and Editor's Choices) for Nikon DX cameras.
Many professionals tend to prefer the "full-frame" FX format
(inherited from the bygone era of 35 mm film).
However, the "crop sensor" DX format can be superior in some domains,
like wildlife photography and macro-photography.
(Wedding photography isn't one of those.)
New DX lenses cost typically two or three times less than their FX counterparts,
which is an important consideration for those of us who don't earn a
living using photographic gear...
Nikon currently offers four series of DSLR cameras in DX format:
Entry level (D3000 series).
Mid-level (D5000 series).
Semi-pro (D7000 series).
Professional (D500, successor to the D300 & D300s).
The last two qualify as "professional" because of a rugged metal construction
and weather-sealing which the other two lack.
Also, they offer an additional LCD screen on top of the camera to show its
settings and two separate
wheels for shutter and aperture control (in amateur cameras,
both functions are controlled by the same wheel; pressing a button
makes the wheel control aperture instead of shutter speed).
Professionals value such time savers but amateurs don't mind the extra time and effort.
The rest of this webpage singles out the D5500
as the best value for most amateurs in 2016
(unless they have a collection of motor-less lenses).
Also, the D5500 has better video capabilities than the D7200.
With the money you save by buying a D5500 instead of a D7200,
you can get a nice fast prime lens,
a good third party flash unit and a
tripod...
Most cameras listed here produce the same great picture
quality, using a 24-megapixel sensor with no optical low-pass filter
(older versions thereof are used on the D3300 and D5300).
The D500 sports an entirely different type of sensor, rated 20.9 megapixels
and better suited to low-light conditions.
Two features are missing
(not just less accessible) on the D5500:
The arcane (but occasionally indispensable) ability to operate
compatible speedlights in AFP mode (HSS).
Direct white-balance input in terms of the
color temperature of the light source,
in kelvins (K).
Both features could be supplied by Nikon in a future D5500 firmware upgrade,
if they choose to do so. They are available on the D7200,
but the D7200 is still lagging in the video department.
For many years, an important gripe about all
Nikon DX cameras had been their inability to change the aperture in liveview
or when shooting video (because the aperture control is mechanical).
The issue is fixed on the D500.
Nikon's lineup of some recent DX cameras (2015-2016)
This last point compares unfavorably to Canon cameras of the same class,
unless you're shooting with a newer "E" Nikkor lens
(electromagnetic diaphragm) like the
16-80 (2015)
or 200-500.
Otherwise, on all DX Nikon cameras before the D500,
the aperture selected when you enter liveview or
start shooting video cannot be changed until you're done.
In Liveview, what you see is actually shot with that aperture.
This gives you a depth-of-field
preview but may darken the field and hinder autofocus.
If that's a concern, you may enter liveview at full aperture and select
a different aperture for the next still shot.
That would be fine and dandy, except that the new darker aperture
automatically becomes selected for liveview once that shot is taken
(to return to the previous situation, you must exit liveview and open the
aperture manually before returning to liveview).
Inconvenient as it may be for shooting stills, the same design flaw
prevents you from changing the aperture at all during the recording of a video. Bad.
I've had no problems autofocusing an extended telephoto
zoom at 1:6.3 with a Nikon D5500
(that's beyond what the manufacturer guarantees).
Nikon says that the guide number of the built-in
flash of the above cameras is 12 m = 39 ft
at ISO 100 / 21°. (At least, that's what they meant to say.)
Blunder Alert : Bizarrely, Nikon writers misinterpreted as
a temperature the latter part of that
legacy specification
of ISO 100 (formerly known as ASA 100
or DIN 21°).
They went one more step in the wrong direction and thought that
21° was close enough to standard room temperature (293 K)
which is often quoted as 20°C/68°F
(see Celsius and Fahrenheit).
So, they just replaced the former by the latter all over the place, mindlessly!
This now stands, throughout Nikon specs, as an embarrassing monument to the scientific illiteracy
of marketing folks.
The URL of this rant is
www.numericana.com/answer/nikon.htm#blunder
Please, tell me if/when this has been fixed so I can have the joy of removing this derogatory comment ASAP.
I love Nikon and I weep when they put themselves in an embarrassing spot.
The current models of Nikon DX cameras (2017 update)
The D500 is the first Nikon DX camera which allows changing the aperture
in liveview and/or video mode (see above gripe).
The D500 also introduces Auto AF Fine Tune,
which can adjust AF Fine Tune settings for the attached lens,
when focus is achieved in liveview. It memorizes up to 20 lenses.
The D500 has the same autofocusing system as the D5 (Nikon's newest full-frame camera)
and lacks a focusing lamp (presumably because it doesn't need one).
The D500 can shoot state-of-the-art
4 K UHD video
(3840 by 2160 pixels) albeit at an overall crop factor of 2.33.
With a WR-R10
module (list price $127) a D500 (or a D5) can radio-control the
new SB-5000 Speedlight (list price $600).
[ Demo ]
The D500 foregoes a pop-up flash for the sake of robustness and better weather-proofing. It trades
some sensor resolution (14% fewer pixels per unit of area)
for improved low-light performance.
What's Next ?
Nikon's decision of providing only one card slot in the new D7500 has
put it squarely outside of the professional markets
(the possibility of an in-camera backup is crucial for professionals
who might lose their reputations if they lose data).
The recent price-drop of the D500 may herald a
successor at the $1997 price point.
In my book, the mixed card slots of the D500 are not a drawback at all
(it's rather nice to have a very fast card for capturing long burst at the
top frame rate alongside a cheap SD card for backup).
The lack of a pop-up flash is also not perceived as a problem by
professionals and semi-professionals alike.
What could be expected of the successor of the D500 is the possibility
to navigate the menus with the touch screen.
That would probably entail the installation of a proximity switch
(currently lacking) to avoid inadvertently navigating the menus
with one's nose while shooting!
Low-light capabilities also beg for a proximity switch.
(2015-05-30) Frames per Second (fps)
The D5500 can shoot at a top rate of exactly 5 fps.
There are countless videos on YouTube of reviewers who "test" the
continuous-shooting capabilities of new cameras by bringing the camera
lovingly to their cheek (the way James Bond does with his gun)
before taking many out-of-focus pictures of the ceiling...
The result of that is invariably that the camera starts at a rapid rate
and then slows down dramatically after a few shots.
Often, the reviewer will conclude that it takes so many shots to
overrun the camera's buffer, as the true rate of continuous
transfer to the memory card is indicated by the sluggish rate
in the second part of the test. That's true. Kinda.
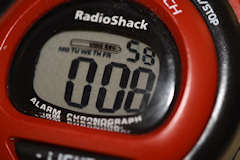
Let's make things a little bit more scientific by taking pictures
of the main measuring instrument itself (a cheap LCD stopwatch).
The D5500 does take 100 pictures of the stopwatch in 20 seconds...
Using the continuous video lights of an SB-500 to
illuminate the running stopwatch, the D5500 was set to manual mode and
manual focus (shutter at 1/200 s).
In high-rate continuous mode the camera took exactly
one shot every 200 ms (it never
went out of sync with the stopwatch).
The camera stopped by itself after those 100 shots because, like many cameras,
the D5500 is designed not to take more than 100 pictures at once
(after briefly lifting my finger from the release button, I was able
to start another sequence immediately).
So, the modest "6-picture" buffer never fills up!
What's the deal?
Well, I was just shooting "JPEG-normal" which,
according to the camera itself, corresponds to 8.6 MB
per picture (using the best resolution of 6000 by 4000).
When shooting 14-bit RAW instead (37 MB per frame)
I got only a burst of 6 pictures 200 ms apart
(that's what 5 fps means).
Then, the rate dropped down to 800 ms per frame
(or, equivalently, 1.25 fps).
That's obviously the way Nikon rated their own camera, which is fair.
When shooting in JPEG-fine
(17 MB per frame) I got 25 pictures in 5 seconds, at the top rate of 5 fps.
Then, the rate dropped to a steady 3.75 fps in the long run...
Let's summarize:
Continuous-shooting capacity of the Nikon D5500
6000 x 4000 Quality
Data per shot
Rapid shots @ 5.00 fps
Long-run rate
Steady data rate
14-bit RAW
37 MB
6
1.25 fps
46.25 MB/s
JPEG-fine
17 MB
25
3.75 fps
63.75 MB/s
JPEG-normal
8.6 MB
100
5.00 fps
Tests conducted with a fast 32 GB memory card
($15)
rated by the manufacturer at 90 MB/s.
(2015-05-18, 2017-01-21) CCD Image Sensor
A close look at the sensors used in Nikon's latest DX cameras.
Nikon uses sensors from different manufacturers in different models:
The Toshiba HEZ1 TOS-5105 sensor is in the Nikon D5200 and D7100.
The Sony IMX-193-AQK is in the D3300, D5300, D5500 and D7200.
The Sony IMX321 CMOS sensor is in the D500 and D7500 (see below).
The first two have the same pixel pitch and the same size,
advertised as 23.5 mm by 15.6 mm.
These are rounded values whose ratio isn't exactly 3/2.
As manufacturing is normally specified in multiples of 0.01 mm,
we're led to believe that the nominal dimensions are the only pair of
4-digit values in a ratio of 3/2
which are properly rounded to the above, namely:
23.46 mm by 15.64 mm
The same result would be obtained by considering that a diagonal of
28.2 mm (used to compute the angular field-of-view of a DX lens as a function
of its focal length) corresponds to 23.4638... by 15.6425...
Thus, the native resolution of 6000 by 4000 corresponds exactly to a square
pixel of 3.91 microns.
By mere coincidence, this is very close to 1/1000 the pitch of
stadium LED displays
(a pitch of exactly 3.90625 corresponds to 256 pixels per unit;
a unit being 250 mm for the LED displays and 0.25 mm for the sensors).
A pitch of 3.90625 microns would correspond to a sensor size of exactly:
23.4375 mm by 15.625 mm
Such a sensor would have a crop factor
of 24 / 15.625 = 1.536 exactly.
However, there are many clues that the designers
of Japanese sensors use nominal dimensions expressible exactly in hundredth of millimeters
(a manufacturing tradition in the West as well).
I am thus confident that this specification isn't currently in use (and probably never will).
The value of 3.92 mm,
which is floating around, isn't compelling either.
(It's the rounded-up value of 23.5/6000, but 15.6/4000 is exactly 3.9.)
However, that would correspond to a sensor size
of 15.68mm by 23.52mm, which can be truncated (instead of rounded)
to the dimensions quoted by the manufacturer (and a crop factor of 1.5306).
No engineer worthy of the name would ever truncate a value rather than
round it to the nearest digit,
but corporate personnel are not always engineers
(and they do blunder in worse ways).
The sensor is widely advertised as "24.2 effective megapixels".
It has a total of 24.78 million pixels.
Its total surface area is about 367 mm2
(rounded from 366.9144 using the above precise dimensions).
Nikon uses 1.53 as the nominal DX crop factor. The "1.5" approximation
is a bit sloppy
(e.g., a DX 300 mm lens has the same reach as a
460 mm lens on a 24x36mm camera, not 450 mm).
Although the sensors on the D5500 and its immediate predecessor (the D5300)
have exactly the same size, Nikon claims the chip has been entirely redesigned
for better performance at high ISO.
Third-party tests
confirm this dramatically...
The former is made by Toshiba, the latter by Sony.
The Nikon D500 Sensor is also used in the D7500
The D500 and the D7500 both use Sony's IMX321 CMOS image sensor.
The published size of that "20.9 Mp" sensor is 23.5 x 15.7 mm.
With two decimal places, only two sizes in a 3:2 ratio would be
rounded to that, namely:
23.49 x 15.66 and 23.52 x 15.68. We rule out the latter thusly:
The maximum image resolution of the D500 is 5568 x 3712 pixels, which is 3 x 2
multiplied into 64 times 29 pixels. As 29 divides evenly 23.49 and 15.66,
we are led to believe that the first of the two previous guesses was the nominal size
intended by the sensor designers. This corresponds to a pixel pitch of
exactly 4.21875 microns per pixel, advertised as 4.2 microns.
To summarize, the nominal sensor characteristics are:
5568 p by 3712 p (20668416 pixels)
23.49 mm by 15.66 mm nominal sensor size
Pixel size: 4.2 u (4.21875 u/p nominal pitch, exactly)
Crop factor : 24 / 15.66 = 4 / 2.61 = 1.5325670498...
When shooting video in 4K UHD (3840 by 2160 p)
the Nikon D500 retains only the central part of the sensor described above, pixel for pixel.
The size of that central part is thus exactly 16.2 mm by 9.1125 mm
(16:9 aspect ratio). The diagonal of that is about
18.587 mm, correspondig to a nominal crop ratio of about 2.3277854.
Let's say 2.33.
(The values of 2.0 or 2.25, given by some reviewers, are misguided at best.)
(2015-05-14) Enabling Back-Button Focus on the D5500
Decouple focusing from the shutter-release "front-button".
The only reason why auto-focusing is, by default, triggered when
the front-button is pushed halfway is to force focusing to occur before
every shot, even for first-time users...
A more flexible way is to assign a separate button to modify focusing on request only,
so that you may recompose the picture without disturbing the established focus.
With default settings, that could be done by maintaining the front-button pressed
half-way or pushing the "AE-L / AF-L" back-button, which locks both the
acquired auto-exposure and auto-focus. However, if the camera is not
handheld, that's not an option (think of night-photography using a tripod).
This is not an an option either in continuous-focusing mode.
To change the operating mode so that the back-button (labeled AE-L/AF/K)
allows focusing when it's depressed and locks it when it's released, just reprogram
your camera as follows:
Push the MENU button (to the left of the viewfinder).
Select the pencil icon to bring up the "Custom Setting Menu".
Select f "Controls", then f2 "Assign AE-L/AF-L button".
Select the last option ("AF ON") to replace "AE/AF lock".
Return to normal operation by pushing the MENU button.
If you choose back-button focus, you may want to consider assigning auto-exposure lock
(AE-L) to the halfway front-button (custom sub-menu c1).
This is not for everybody, but it gives you the ability to focus on one object,
and meter light for an unrelated frame before composing the final shot!
In liveview mode, a new focusing point can always be selected by taping on the screen,
regardless of the status of this back-button.
Other Suggested Custom Settings :
You may consider changing other default settings the same way as above.
For example, I find that the default of enabling an infrared remote
(ML-13) for only one minute at a time can be frustrating.
Thus, I select the "5 minutes" option in the c4 sub-menu.
(2017-06-08) White balance (French: balance des blancs)
Automatic white balance, predefined settings and custom white balance.
The colors of an object depend on the nature of the light-source illuminating it.
The white balance setting of a digital camera is meant to match its three
color channels to that source.
The automatic white balance on which most beginners and many professionals
rely is merely a guess by the camera of what the light source might have been.
That guess is based only on the color information present in the picture itself.
To improve on that, some extra information is needed about the
source (i.e., the actual incident light).
There are several ways to do so. The crudest approach is to pick the most appropriate
description from a few predefined choices.
The most refined way uses a snapshot of the incident light.
For example, the following choices are available on Nikon's entry or mid-level DSLRs, since the D40:
AUTO : The aforementioned educated guess, by the camera.
Flash : Strobes (5400 K matches the specs of Nikon speedlights).
Cloudy : Overcast skies (6000 K, according to Nikon).
Shade : Shaded subjects on a sunny day (8000 K).
PRE : "Preset manual" (custom white balance, described below).
More advanced cameras would also allow the photographer to dial in any color temperature or tint.
However the most precise approach is to take advantage of the last
alternative by using the camera itself to measure the incident light.
To do so, we need one of the following accessories:
A calibrated white or grey card (typically, 18% neutral gray).
A white-balance "filter" (ExpoDisc® 2.0, or any cheaper equivalent).
(2015-05-18) Commander mode using an SB-500 speedlight on a D5500
The SB-500 communicates with slaves using light pulses before a flash.
The only way the D5500 camera can communicate with external flash units is via its hot shoe.
It doesn't have a traditional PC-sync socket.
The built-in flash of the D5500 can't control remote units
in "commander" mode. To do that, you must put an SB-500 speedlight in the hot shoe.
Nikon's documentation for the 5500 camera only mentions the SB-500 for that rôle.
Some larger Nikon speedlights might work too.
What's clear is that the big units feel too heavy on top of the smallish D5500 camera,
for which the SB-500 is a perfect match.
I'm not aware of any third-party unit which can replace the SB-500 as a commander.
The YN568EX discussed below works perfectly as a slave.
The D5500 supports only two groups of remote speedlights (zone A and B).
Both are independently controlled from the camera through the camera-mounted
SB-500 speedlight.
This old-school system depends on light signals from the master unit just before each flash.
It has severe limitations:
All slave units must be placed no more than 30° from the forward direction of the
commander.
The slaves can't be too far away and their receiving photocells must face the commander.
If you can spare a bit of money and a little room in your camera bag,
it's far better to invest in a set of radio-controlled radio transceivers
which provide radio-controlled hot shoes taking their commands from
one central unit mounted on your camera. Radio-control has none of the
above restrictions.
Yongnuo YN568EX for Nikon :
Stay away from the related YN568EX II, which is designed for Canon.
The width of the beam can be set manually to 24, 28, 35, 50, 70, 85 or 105 mm,
in that order, by pressing briefly the ZOOM button.
After that, it goes back to "auto" (as indicated by the lack
of an "M" circled in black on the LCD, before the aforementioned numerals)
which puts the head either to the "35 mm" setting or to whatever
position is best suited for the lens currently mounted on the camera
(if the YN568EX is able to communicate with it via the hot shoe).
When the built-in diffuser of the YN568EX is pulled out, all of the above is overridden.
The LCD shows "(M) 14 mm" and the zoom head automatically retracts to its widest setting.
To make the YN568EX enter or leave its slave mode, you push the ZOOM button for a long time
(ignore what the printed manual may say about using the CH/GRP button for that purpose).
In the slave mode, the two large LEDs in the front of the unit keep flashing.
When the unit is mounted on the camera, it automatically leaves slave mode.
To communicate with the SB-500, the YN568EX must be programmed (once and
for all) while it's in slave mode.
To do that, select "Channel 3" (the only channel of the SB-500)
by pushing the CH/GRP button once and using the
D-pad until a tiny "3" appear
at the bottom of the LCD. Press the CH/GRP button once more to select,
with the D-pad,
the group you intend to use (A or B, since C isn't a valid choice on the D5500;
the group setting of the SB-500 is irrelevant when it's used as a commander).
Press ZOOM when done.
The CH/GRP button stands for "Channel / Group" and alternates
between the two types of selections just described (or neither of them) when the unit
is in slave mode. In normal mode, the CH/GRP button acts exactly like the
ZOOM button, except that pressing it for a long time won't put you into slave mode,
as remarked above (in spite of what the printed manual may say).
No Auto-FP (HSS) :
Normally, a Nikon camera in commander mode should allow a remote unit capable of
Auto-FP, like the YN568EX, to fire as such,
whenever the shutter speed is faster than 1/200 s.
Apparently, the D5500 isn't able to do so in the commander mode enabled by
mounting an SB-500 on it.
A second-class citizen, in that respect at least.
This is merely a problem with the firmware of the D5500 (whose built-in flash
doesn't support AFP). Arguably, the firmware should either make the following
assumption by default, or at least provide a menu option to allow it to be made:
When the on-camera SB-500 is in commander mode and set not to fire itself,
shutters speeds slower than 1/200 s can be used because the remote
units will provide AFP illumination (it's the responsibility of the
photographer to make sure they do).
Speedlight is a brand name introduced by Nikon in the 1960s.
The alternate spelling "Speedlite" is a trade name used by
Canon and
Ricoh.
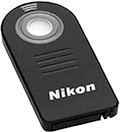
(2015-05-14) Remote Control
Cable, infrared, wireless and Wi-Fi.
Nikon's ML-L3 (shown at right)
is a tiny single-button infrared remote-control unit.
The genuine Nikon model may cost $20 or more.
However, for $5 or less, you can have nearly identical substitutes or
multi-brand models.
If you're not afraid of microcontrollers,
the technical information to make your own Nikon-compatible IR-remote
is given elsewhere on this site.
That may also be used to program a smartphone having an infrared link.
There are two infrared receivers on the D5500 camera;
one in the front (in the middle of the grip) and one in the back
(to the left of the MENU button).
There are several ways to enable the infra-red link for a short amount of time
(the default duration of one minute can be changed to
5, 10 or 15 minutes, using the c4 sub-menu).
The quickest way is to press the "release mode" button (in the
front, below the big lens-lock button) and rotate the dial
to select either of the infrared release modes
(you can choose between immediate action and 2-second delay).
Unfortunately, the current D5500 firmware doesn't allow
the ML-L3 to be used for video.
To start and stop a video remotely, you may use one of the wired accessories
described next and make the following deep selection:
SETUP MENU > Accessory terminal
> Remote control > Remote shutter release > Record movies
Cancel that by selecting "Take photos" instead, when done with videos.
Third-Party Cable Release, with Timer :
On the D5500, the connector to use for an electronic
cable release
is located topmost behind the side-door to the left of
the screen (below the Wi-Fi logo). It's also used for the GPS
accessory (unlike the D5300, the D5500 doesn't
have GPS built-in).
Some vendors have released (to mixed reviews) GPS receivers combined with
with cable releases which make use of both functions of that port!
(Here's how to make your own Nikon GPS.)
Nikon's standard cord (MC-DC2) doesn't
take batteries (it's purely mechanical).
The locking button on it simulates perfectly the release button
of the camera, including the halfway feature normally used to
initiate autofocusing. The Nikon unit
goes for $22 but
a good work-alike is $10.
However, what I recommend is a cable release
with a timer. Nikon doesn't make one.
Such a unit requires batteries for its timer only.
When batteries are not installed, it works exactly
like Nikon's MC-DC2.
That's to say, the big button on the remote acts just like the camera's own
release button, which you no longer need to touch.
This removes the major source of camera-shake
and makes a tripod-mounted
more reliable when shooting with a telephoto lens at moderate shutter speeds or
any lens at slow speeds, including long exposures using
"bulb" or "time" shutter modes.
(In traditional cameras, the shutter was pneumatically controlled by an air bulb,
which you squeezed for as long as you wanted the shutter to stay open.)
Another known source of residual vibrations are mirror bounces.
To eliminate that problem, some cameras offer to delay release
after raising their mirrors (a one-second delay is more than enough).
On the Nikon D5500, the d1 sub-menu takes care of that.
For $18,
I bought the popular unit shown at right, sold under several discount brands
like Neewer® (mine bears a "Shoot" logo).
Its large locking button functions like the button of an MC-DC2,
with or without batteries in the unit.
(If there are batteries, the LED becomes green when the button is
pressed half-way and red if it's pressed all the way.)
The battery-powered timer is a very useful addition.
Five independent parameters can be programmed, for automated shooting:
Delay before the first shot.
Duration of each shot (if the camera shutter is in "bulb" mode).
Interval between the end of one shot and the beginning of the next.
Number of shots (either unlimited or any number from 1 to 399).
Beep (during long exposures) on or off.
Press the center of the
D-pad
(labeled SET) to modify whatever parameter is underscored
by the cursor at the top of the LCD screen.
If that parameter is a time (#1, #2 or #3) you may use sideways motion on the
D-pad to pick the units to modify (hours, minutes, seconds).
You use up or down directions to change the (blinking) selection.
Once satisfied with that setting, press SET to validate your choice.
You may then use the D-pad sideways to select another parameter and visualize
its current value (which you may modify, if desired,
using the procedure just described).
For the number of shots, the setting between 399 and 1 is displayed as
"--" which indicates that the unit will keep firing until
the sequence is aborted (with the TIMER START/STOP button).
Parameters #4 and #5 (number of shots and beeping mode) are always displayed
on the second line of the LCD (where a musical note is shown when beeping
is active). No time is displayed (on the first line)
when either of those is selected.
When it's not silenced, the unit beeps once per second during long
exposures (i.e., when parameter #2 is nonzero).
When parameter #2 is set to zero, the unit will actually send pulses lasting
0.2 s and the duration from the start of each pulse to the next is
thus equal to 0.2 s
plus a whole number of seconds (namely, the value of parameter #3,
which can't be zero).
The top-right button (labeled TIMER START/STOP) is used to start
the programmed sequence, or abort it.
During a sequence, the LED is green two seconds before each shot
and glows red during every shutter release.
The unit has no on/off switch because it consumes very little current
when it's neither in a sequence of shots nor in the setting mode
(as indicated by some blinking on the LCD, including at least one of the three
indicators on the bottom line: "TIMER ACTIVE", "SET", "RELEASE").
The top-left button can be pressed briefly
to provides a few seconds of backlight.
When pressed for a long time, that button forces the unit
into (or out of) a locked state
where all other buttons are disabled, as indicated on the LCD
by a large "L" in a black square.
This helps the unit survive unprotected in a camera bag.
The unit suffers from a few inconsequential design flaws, namely:
The firmware won't properly issue one beep per shot when the unit
is set for short exposures (i.e., when parameter #2 is zero).
Beeps are actually generated at a constant rate of one pulse per second
not synchronized with releases and just muted between shots.
So, most brief shots will be silent, as no such pulse occurs during exposure.
A locked unit will still light up when the top-left button is pressed.
One last minor gripe:
There's no way to dim the LED or turn it off completely
(for nighttime photography). Once you're satisfied that the unit
works properly, the LED can be a visual nuisance which only drains the
batteries unnecessarily.
To remedy that, I am considering putting a switch in series
with the LED (with or without a potentiometer).
The battery compartment provides ample room to install that,
without ruining the look and feel of this nice unit.
On the other hand, I love the fact that all timing parameters are set
in increments of one second
(up to 99 hours, 59 minutes and 59 seconds) using a uniform procedure.
Exposure durations using the camera "bulb" mode aren't restricted to
any predetermined sequence (like the usual
sequence of long exposures: 3, 4, 5, 6, 8, 10, 13, 15, 20, 25, 30, 40, 50...)
Here are a few creative ways to use this cable release.
The first example makes no use of the timer (it can be used with any cable).
Set the camera at a shutter speed of thirty seconds in continuous
shooting mode (at high or low rate; it doesn't matter).
Push the main button on the release and lock it with the slider.
The camera will then take a continuous sequence of 30 s exposures with
only a fraction of a second between shots. (See how
Tony Northrup
uses this technique to get a good image of star trails.)
Set the shutter to "Time" rather than "Bulb" to obtain a
series of pictures where the shutter is open exactly
50% of the time.
The duration of every exposure is the
sum of parameters #2 and #3 (interpreting a zero value of #2 as 0.2 s):
1.2 s,
2 s,
2.2 s,
3 s, etc.
Determine experimentally what effective shutter speed is obtained
when parameter #2 is set to zero and the camera is
set on "Bulb".
HINT: Instead of assuming 1/5 s
from the above timing considerations, just photograph an object of
known speed (e.g., take a picture of a vertical ruler with
a falling marble released in front of it at position zero, shortly
before the shot).
Wi-Fi
One of the latest trends in digital cameras is the use of Wi-Fi for communications.
Nikon's
Wireless Mobile Utilitypromises
that immediately with "your smartphone or tablet".
Does it deliver?
Well, not necessarily; the app can only be installed on compatible devices.
My Chinese Irulu tablet isn't. What's the technical reason for that?
(2015-06-02) Geotagging with an external GPS receiver
How the camera receives information from an external GPS module.
Here's the pinout of the cable to the GPS/remote port.
As noted above, the connector accommodates a purely mechanical
cable remote (which connects #5 to #3 for a half-press and #6 to #3 for a full-press
of the release button).
GPS module communicate using the
NMEA 0813 standard
(National Marine Electronics Association).
That standard allows one-way communication from a single talker
(the GPS module) to several listeners
(making it possible to connect in parallel
devices like cameras, display units, computers or microcontrollers).
Balanced lines are recommended but the standard also allows the simple TTL-level
signals which Nikon uses. Asynchronous serial communications is performed
with no handshake at 4800 bauds,
8 data bits (bit 7 being 0) no parity and one stop bit.
A GPS module sends full sentences consisting of a line of
printable ASCII characters ending with a carriage-return
(CR = ASCII 13) and line-feed
(LF = ASCII 10).
Every sentence starts with a dollar sign ($) followed by no more than
80 characters before the end-of-line (CR+LF).
Just before that end-of-line, a
checksum
can inserted which consists of a "*" followed bt two hexadecimal digits.
Those hexadecimal digits represent the byte obtained bitwise addition
(XOR) of all ASCII characters between $ and * (both excluded).
A sentence may contain several fields separated
by commas (a field may be empty).
The initial "$" is followed by a 5-character formatter of one of three kinds:
The Nikon oddball "NKGCS" which replaces "$PGRMM"
(see next) in modules meant to interface with Nikon cameras
(including the Solmeta Geotagger).
The letter "P" (for "proprietary") followed by a three-letter
manufacturer ID and a single-letter format code specified by that manufacturer.
One of
many
examples of the former part is "GRM"
for Garmin Corporation, in which case the latter single-letter format code
might be "M" for "Map datum",
yielding the aforementioned complete prefix "$PGRMM".
A two-character identification of the type of talker
("GP" for GPS module) and a three-letter format code, like
"RMC" for the "recommended minimum GPS data"...
For a GPS talker using a "$GP" prefix,
Glenn Baddeley
has compiled more than 60 different NMEA 5-letter formats
and gives detailed information about 26 of them, including
$GPRMC and
$GPGGA.
A listener won't understand every possible NEMA format and
may not care about some fields within its recognized formats.
Nikon cameras apparently only pay attention to the four formats
presented below (where the characters "--" are wildcards which
stand for "GP" or any other talker ID).
$--RMC,hhmmss.ss,A,llll.ll,a,yyyyy.yy,a,x.x,x.x,xxxx,x.x,a*hh
RMC = Recommended Minimum Data for GPS. 11 fields + checksum:
 1) Time (UTC)
 2) Status, V = Navigation receiver warning
 3) Latitude
 4) N or S (North or South)
 5) Longitude
 6) E or W (East or West)
 7) Speed over ground, knots
 8) Track made good, degrees true
 9) Date, ddmmyy
10) Magnetic Variation, degrees
11) a = E or W  (Easterly or Westerly)
 *) Checksum

$--GGA,hhmmss.ss,llll.ll,a,yyyyy.yy,a,x,xx,x.x,x.x,M,x.x,M,x.x,xxxx*hh
GGA = Global Positioning System Fix Data. 14 fields + checksum:
 1) Time (UTC)
 2) Latitude
 3) N or S (North or South)
 4) Longitude
 5) E or W (East or West)
 6) GPS Quality Indicator
    (0 = no fix, 1 = GPS fix, 2 = Differential GPS fix}
 7) Number of satellites in view  (00 to 12)
 8) Horizontal Dilution of precision
 9) Antenna Altitude above/below mean-sea-level (geoid)
10) Units of antenna altitude, meters
11) Geoidal separation
    (height of mean-sea-level geoid above WGS-84 reference ellipsoid)
12) Unit of geoidal separation (M for meters)
13) Age of differential GPS data, time in seconds since last SC104
    type 1 or 9 update, empty field when DGPS is not used
14) Differential reference station ID, 0000-1023
 *) Checksum

$NKGCS,WGS 84*11
$NKGCS = Nikon Global Coordinate System (??). Replaces the following:
$PGRMM,c---c*hh
$PGRMM = Map Datum (Garmin proprietary sentence). 1 field + checksum:
 1) Currently active horizontal datum (WGS 84, NAD27 Canada, ED50, a.s.o)
 *) Checksum

$--HDG,x.x,x.x,a,x.x,a*hh
HDG = Heading, deviation & variation. 5 fields + checksum:
 1) Magnetic Sensor heading in degrees
 2) Magnetic Deviation, degrees
 3) Magnetic Deviation direction, E = Easterly, W = Westerly
 4) Magnetic Variation degrees
 5) Magnetic Variation direction, E = Easterly, W = Westerly
 *) Checksum
When it's directly mounted on the camera's hot shoe,
a GPS module with a built-in magnetic compass can let the heading
($HCHDG)
indicate the geographical direction of the shot.
An onboard accelerometer would be able to determine the pitch angle
(tilt or jaunty angle) and roll as well
(Dutch angle
or apparent inclination of the horizon).
Adding heading, pitch and roll (HPR) information to the EXIF header is a relatively
new concern
(2012).
I don't know how good the Nikon software is at processing pitch and roll information
from the units that provide it (in particular via $PTNTHPR sentences).
(2015-05-14) External power for Nikon's D5200, D5300 and D5500
EP-5A cable coupler and EH-5 power supply (AC) are sold separately.
Nikon's EP-5A (DC-coupler) physically replaces the battery and routes a cable through
an otherwise unused opening out of the battery compartment. Outside, the
cable is attached to a proprietary Nikon connector.
The connector from the EP-5A then plugs into an EH-5b power supply
(Nikon's newer version of their older EH-5, which still works fine).
Nikon's original parts are wildly overpriced
($39 for the EP-5a and
$90 for the EH-5b on Amazon).
Third-party solutions are more reasonably priced
($40 for both items, instead of $129).
(2015-05-29) Tripods, Monopods and Light-stands.
A small selection at various price points.
You need at least one tripod. Many types of interesting photos
can't be shot without one. Get yourself an inexpensive model if you
must; it can always be recycled later into a good lightstand when you upgrade
to a better model.
For the utmost in comfort, plan to use the tripod standing completely upright
with the camera visor at eye-level.
That requires an extended height at least equal to your own height
minus 7'' (178 mm).
Anything taller is only useful to support lights.
Anything smaller will force you to stoop a little...
When weighing down lightweight tripods, good stability is achieved
by putting your whole camera bag in a low-hanging stonebag.
However, a stonebag is a relatively bulky item to carry...
If the tripod is equiped with a hook at the bottom of the center column,
a better option is to tie a bungee from that hook to your bag underneath.
In windy conditions, this is a must.
It's a bad idea to hang something on the hook instead
(less stability and more stress on the tripod).
Do carry a good bungee cord with hooks on it...
That tall basic tripod is inexpensive but decent.
It features a carrying handle (attached between the column and the head)
and comes with a carrying bag.
The three-sections aluminum legs with lever-locks have foam-grips at the top.
A self-centering geared aluminum column, with a locking ring,
raises the head to the desired height using a small crank.
The base has a bubble level to make sure the column is vertical.
The panoramic head has a locking handle and a tilt level.
The construction involves rivets and heavy-duty plastic.
This tripod can easily withstand normal use but no amount of abuse.
Carbon Fiber Travel Tripod
The no-frills Amazon Basics model
($80)
extends chest-high to 52'', (1320 mm)
folds down to
12.4'' (315 mm) weighs 2.2 lb
(1090 g) and can withstand a 12 kg load.
My Zomei Z669c model
($150)
took two weeks to come from China (June 2015). Worth the wait.
It's desirable because of its looks, quality,
price and versatility. It extends to 61.4'' (1560 mm)
folds down to 13.8'' (350 mm) weighs
2.9 lb (1320 g) and can withstand an 8-12 kg load.
The legs can be locked in two different positions.
The wide-angle position provides a large base even when the legs are not
fully extended. This is a nice option in unusual situations where
the full height of the tripod is not needed or not desired.
(Tabletop use, for example.)
The center column has a detachable hook.
The column can be reversed to transform the tripod into a
macrophotography stand or allow a very low position of the camera
(for the ultimate in flexibility, you may want to get an all-metal accessory
($6.80)
which allows you to hang the camera securely from its hotshoe).
In a pinch, you can reverse the legs instead of the column
(in this makeshift configuration, the angle of the legs can't be locked
but the joints are stiff enough to make a narrow angle stable).
One leg of the tripod can be detached and
assembled with the center column to form a good monopod,
58'' in height (62'' with the ball-head).
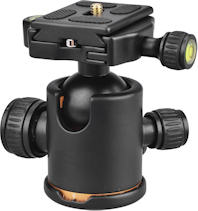
The ball-head supplied with this tripod has been
re-branded under several names.
It's hefty and well-built but its independent locking panoramic joint
is much too stiff (that's my only complaint about this tripod kit).
The head can be detached for other uses,
including the DIY project described in the next section
(it's a 3/8'' joint, not 1/4'').
This ball-head is great on a monopod, where the
panoramic joint is irrelevant.
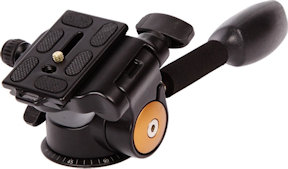
I've replaced the above with the fluid-damped pan-head at left,
which accepts Arca-Swiss-type plates with more than 38 mm edge-to-edge spacing
between safety screws (PU-60 plates are fine
but you'd have to remove at least one screw from a PU-50).
It's branded Koolehaoda, but the style is so similar to the
Zomei unit that I suspect it to originate from the same factory.
With that panoramic head attached, the legs can't be folded back and the tripod
only collapses down to a height of 20''.
The flat space at the top of the column can accommodate a third-party
18 mm circular bubble spirit level.
Monopod and Hiking Stick :
One of the highest praise that can be given to the sturdiness of
a photographic monopod is that "it can be used as a hiking stick".
Few can. If that's what you have in mind it can be better
to get a real wooden hiking stick
(the standard length is 55'')
and convert it into a monopod...
To do so, flatten the top of the hiking stick and drill
a hole in the center to secure a long threaded rod protruding a bit,
to match whichever standard fits your ball-head
(adapters are available but the result will be less sturdy).
For durability, a metal ferret around the wooden stick is a nice addition
which isn't absolutely necessary (manufacturers of 3-piece hiking sticks often
omit ferrets to save costs).
My local Ralphs supermarket sells ($20)
a suitable wooden 3-piece 55'' hiking stick from China, under the brand
Live Well Life Styles
(WS115-3PC).
For the same price, they also carry single-piece hiking sticks which are better
if you don't have to travel by plane...
Threaded Studs ( 1/4'' or 3/8'' )
Following the lead of the legendary Brownie camera,
almost all consumer cameras feature a 1/4'' coarsely-threaded socket
to secure them to tripods
(1/4-20 UNC, per
ISO 1222).
Instead, some professional cameras
(medium format or larger) use the sturdier
3/8'' standard (3/8-16 UNC).
Examples include all Hasselblad cameras and my own
Mamiya 645,
pictured at right with the thread-reducer which
allows the use of regular grips and tripods.
The current trend is to use the larger studs (UNC 3/8-16)
to connect detachable tripod heads to tripods and the smaller ones
(UNC 1/4-20) between tripod heads and not-too-large cameras.
On older cameras and tripods, the BSW versions of those two were used
(British Standard Whitworth) .
The UNC and BSW threads have slightly different tooth profiles
(UNC is 60° with flat crest, BSW is 55° with rounded crest).
They can mate, but knowledgeable people will never force them upon each
other (which amounts to having the threads retool one another).
Nowadays, BSW standards are all but entirely obsolete (including the
smallish 3/16-24 BSW, which has no current UNC counterpart).
Microphones use a 5/8-27 UNC mount.
Following the nominal diameter in the specification
of a threaded rod is the number of threads per inch (TPI).
In photography, it's always
understood that 1/4'' screws are 20 TPI
while 3/8'' screws are 16 TPI
(the UNC profile being used in both cases).
Therefore, quoting the diameter suffice,
unless you use general hardware supplies in DIY photography projects.
It's also important to know what height either type of stud is supposed to be.
Longer studs could damage the mounting sockets of expensive cameras
while shorter ones would provide less reliable fastening.
Some manufacturers give explicitly the maximum screw length their camera sockets
can safely sustain. 5 mm is always safe.
Lumix DMC-ZS25: 1/4'' screw shorter than 5.5 mm (0.22'').
5/8'' Top Smooth Studs for Lightstands :
At the top of the lightstands typically used in a studio environment, we always find round
unthreaded steel studs 5/8'' in diameter.
Such a top stud is usually surmounted by a standard UNC 1/4-20 mount covered by
a threaded plastic cap (often acting as a bumper preventing metal-to-metal contact).
This was a great camera and a wonderful set of lenses.
I spent a quarter of a century with it and it was a very happy part of my photographic life.
The F2 was released a few short months after I got my Nikon-F, in 1971.
At that time, cameras of either type were normally sold with
an oversized pentaprism featuring a lightmeter for through-the-lens metering
(TTL).
The improvements seem minor now but they were significant at the time:
On the Nikon-F, you must detach the back completely to change the roll of film.
The loose back could be dropped (although it never happened to me).
On the F2, the back is hinged.
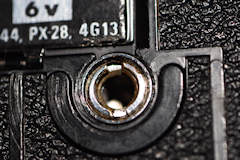
On the F, the lightmeter battery is inside the prism assembly
(you must detach the prism to access the battery compartment).
There is absolutely no electrical connection between the lightmeter
and the F1 body. To turn the meter on and off, you had to push
a small button on top of the prism (a red ring at the base
indicated that the meter was on and that there was some battery drainage).
On the other hand, the battery compartement was at the bottom of the
camera and the on/off switch was coupled to the film-advance lever
(off when that lever is pushed in, in the position normally used for storage).
Another innovation which came with the introduction of the F2 was that you
could read the current aperture from the viewfinder.
To do this, newer lenses (manufactured after 1971)
have the aperture scale duplicated in small print at the very back of the
aperture ring, close to the body. Post-1971 lenses also have holes
on both sides of the measuring yoke to allow
more light to reach that tiny scale.
The position of the iris ring was communicated mechanically to the lightmeter
via a fork-and-pin mechanism characterized by a prominent metering yoke (or metering prong).
The photographer had to turn the iris ring all the way to the maximum aperture
to make the meter aware of it. This manual indexing
allowed light measurements at full aperture to be properly corrected
for the aperture that the lens would step down to (very fast)
upon shutter release. Until this operation was properly performed,
the indication given by the lightmeter was simply erroneous.
Mouting the lens that way quickly became second-nature for all Nikon shooters.
Confirmation that a lens was correctly coupled to the meter was visible
on the front of the prism (a large index behind a cutout slot with
aperture makings for the Nikon-F or a tiny white dial in a window for the Nikon-F2).
As the coupling was very reliable, nobody ever bothered to check that confirmation.
Automatic Indexing (AI) :
In 1977, Nikon decided they should allow their new bodies to determine the
full aperture of a newly attached lens without the slightest additional human intervention.
To that effect, they started carving the back of their new lenses to encode
maximal apertures so their new bodies could read that information automatically.
The system became known as
automatic maximum aperture indexing (AI for short).
Such AI carvings are utterly ignored by early Nikon bodies
(Nikon-F, Nikkormat, Nikon-F2).
However, old lenses (manufactured before 1977)
must be retrofitted before they can be used on newer bodies.
At first, Nikon provided the upgrade for free.
There is no downside to that upgrade.
Non-AI lenses (pre-1977 without AI conversion) should never be mounted on AI bodies lest mechanical damage occur!
(2015-06-21) Macro extension tubes
Buy only automatic extension tubes.
By increasing the distance from the lens to the
focal plane, extension tubes allow an ordinary lens to focus at smaller
distance than what it's normally capable of,
with little or no decrease in image quality.
The only drawback compared to
specialized macro lenses is a significant
darkening or the field for extreme close-up.
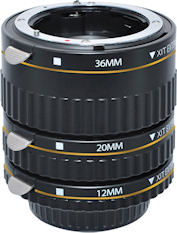
The widely-available set of Xit ™
automatic extension tubes pictured at right will set you back between
$41 or
$45
nowadays.
It consists of three tubes labeled
12 mm, 20 mm and 36 mm.
Incredibly enough, two of those numbers are incorrect!
The actual extension they provide are 13 mm,
19 mm and 36 mm.
Beyond the mistake that one engineer made,
what I find difficult to believe is that nobody noticed that until now!
One foolproof way to measure the extension of each tube is to put two of them
together and measure the whole thing using calipers
(include endcaps if you must).
Repeat the measurement for only one of the tubes
(with the same endcaps you had the first time around) and
subtract from your previous result to
obtain precisely the extension provided by the other
tube. What I got, to the nearest tenth of a
millimeter, was: 12.9 mm, 19.1 mm and
35.9 mm!
To quickly confirm the mistake so detected, notice that the plastic collar
is 6 mm thicker in the second tube compared to the first one
(the difference would have been 8 mm if the manufacturer's markings
had been correct).
To correct the labels, I blackened the erroneous numbers
with a Sharpie, wrote the good ones with a coarse silver Sharpie with a bit of touch-up
from a fine black sharpie. This looks like a hand calibration, as it should.
Correct focus extensions provided by the above set of tubes
(Xit ™ )
13 mm
19 mm
32 mm
36 mm
49 mm
55 mm
68 mm
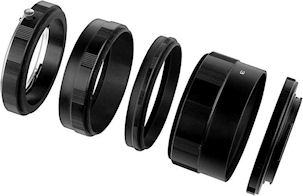
Except for basic experimentation
(pinhole and such)
avoid manual extension tubes
($8.39 on eBay)
which have neither
electrical couplings (auto-focus and vibration reduction)
nor mechanical coupling (aperture).
Those are all but useless with G-type lenses
(which lack aperture rings).
The generic set pictured above consists of two end pieces providing
a combined extension of 15.8 mm
(use any other complete extension set to measure that value,
with the above differential method).
The three intermediate threaded tubes (57 mm thread) are numbered 1, 2 and 3.
They provide additional extensions of 7 mm,
14 mm and 28 mm.
That makes it possible to obtain eight different equally-spaced extensions:
15.8 mm + (7 mm) n for n = 0 to 7
If the third tube had been labeled "4" instead of "3", we could have
described the above "n" as the sum of the labels printed on the tubes used... Too bad.
Extensions provided by the above generic set of tubes
(to the nearest mm)
16 mm
23 mm
30 mm
37 mm
44 mm
51 mm
58 mm
65 mm
As an exercise in arithmetic, the combination of the above two sets
of tubes allows the following 57 different extensions (in mm) in manual mode.
Six of them (underscored) are obtained in two different ways
(within 0.2 mm of each other):
13, 19, 29, 32, 35, 36, 42, 43, 48, 49,
50, 52, 55, 56, 57, 59, 62, 64, 65, 63,
66, 68, 69, 70, 71, 72, 73, 76, 77, 78,
79, 80, 83, 84, 85, 86, 87, 90, 91, 92,
93, 94, 97, 98, 99, 100, 101, 105, 106, 107,
112, 113, 114, 119, 120, 126, 133
(2016-12-17) Lens in Reverse Mount
On body or in front of another lens.
As G-lenses don't have aperture rings, you need a special device
on the bayonet side of a G-lens to operate its aperture when it's reversed.
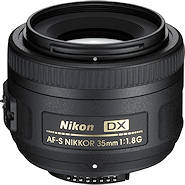
(2015-05-14) Sharp normal lens for low-light conditions
($167-$197)
Nikon 35mm f/1.8G AF-S DX
52 mm filter size. HB-46 hood.
DX reach: 54 mm (normal).
No distance indicator on lens.
Inexpensive. Great optical qualities.
No VR image stabilizer
(must shoot handheld
at 1/60 s or faster).
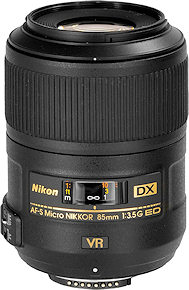
(2015-05-14) Macro lens & long portrait lens
($527)
Micro-Nikkor 85mm f/3.5G AF-S DX ED VR
I never had the comfort of a dedicated macro lens before.
The experience was a revelation and this pricey lens is now a favorite.
52 mm filter size. HB-37 hood.
DX reach: 130 mm (long).
The aperture range is:
f/3.5 - f/32 when focused at infinity,
f/5 - f/45 at a 1:1 reproduction ratio.
The VR image stabilizer is pointless in tripod macro-photography
but allows this sharp lens to be used very comfortably for portrait
(in spite of the 1:3.5 aperture which can't bring about
extreme bokeh).
The manufacturer's rating of three f-stops for the VR stabilizer would
allow this lens to be used for portrait at 1/15
(instead of 1/125 s normally).
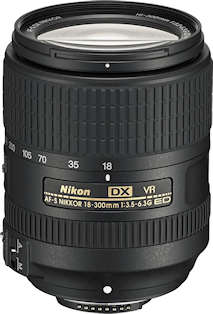
67 mm filter size. HB-39 hood.
DX reach: 28-460 mm (telephoto).
No focus distance indicator on lens.
Not to be confused with its predecessor:
Nikon 18-300mm f/3.5-5.6.
The manufacturer claims that the VR image stabilizer
allows a gain of 4 f-stops,
which means that the lens could be operated
handheld, in the longest telephoto position,
with a shutter as slow as 1/30 s
(instead of 1/500 s without VR,
according to common wisdom).
(2017-01-22) Complementary Zoom Pair: Wide-Angle to Telephoto
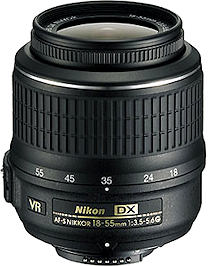
Nikon 18-55mm f/3.5-5.6G AF-S DX VR (kit lens, less than $90 used)
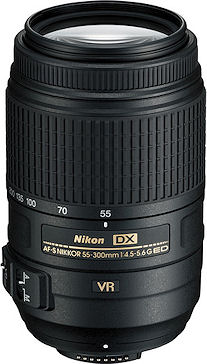
Nikon 55-300mm f/4.5-5.6G ED AF-S DX VR ($233 new, $120 used).
Theses two lenses provide an economical coverage of all common focal lengths for amateur
use, with a few cost-saving shortcomings.
They have different filter sizes (52 and 58 mm) but otherwise share
the same design approach:
No bayonet for hoods. No distance scale.
The focusing ring is tied directly to the filter thread.
This means that a polarizing filter would rotate during focusing.
(One risky "solution" is to use either lens with a cheap generic rubber hood in front of
the polarizer and to grab the hood.)
The focusing is either manual or automatic (you have to use the switch
to disengage the clutch if you want to override auto-focus)
and it is external (i.e., the physical length of the
lens changes as the focusing distance varies).
Dec. 2007 (type II since Jan. 2014)
18-55 mm (28-84 mm reach)
52 mm filters. HB-45 snap-on hood.
263 g Vibration reduction (VR)
Plastic mount.
I got both of those lenses as a used set (in excellent condition)
from Leo Evanitsky,
at auction on eBay for $228.50 (+$15 shipping) on 2017-02-18.
The rear cap of the 18-55 had to be upgraded from an LF-1 to an LF-4.
This was to complete a fun camera kit around a barely used Nikon D40 body
from Sam K. Kim (for $69 at auction, on 2017-02-17).
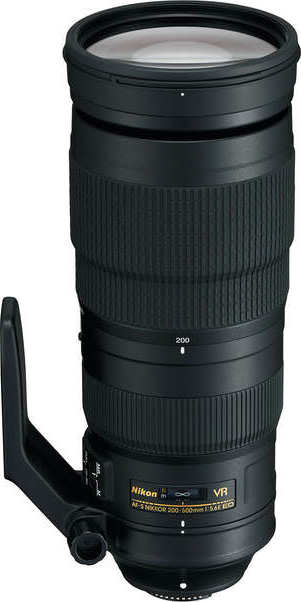
(2017-01-05) Telephoto Zoom
AF-S Nikkor 200-500mm f/5.6E ED VR
($1212-1399).
Included: tripod collar,
HB-71 hood, end caps.
LC-1434 pouch included.
95 mm (1 mm pitch) filters.
Usable with FX cameras.
DX reach: 307-767 mm.
D500 reach for 4K video: 455-1164 mm
Electromagnetic aperture (E).
Close focus: 2.2 m (7.22').
Reproduction ratio: 1 : 4.
Iris: 9 rounded blades.
Minimum aperture: f/32.
19 elements in 12 groups
(including three in ED glass).
Mass: 2.3 kg, with collar.
4.5 stops of Vibration Reduction (sports mode).
Compatible with modern Nikon teleconverters
(1.4, 1.7 & 2.0) retaining
autofocus only for 1.4 with f/8 camera
(e.g., D500).
Hoods for FX Zoom Telephoto Lenses in DX Photography :
All of the above are FX lenses. The hoods provided
for them by the manufacturer are adequate, but not optimal. There are
two reasons for that. First, those hoods are designed to avoid vignetting
at the shortest focal length; a hood designed fot the longer end would be much
narrower. Second, we can use for DX photography narrow hoods which
would cause vignetting in "full-frame" FX photography.
This includes affordable cyclindrical hoods, consisting of 95 mm
blackened aluminium tubing with black-felt lining and filter threads (one male, one female).
My own solution is to add a cheap screw-on
Promaster Rubber Hood at the end of one
of these, which provides a great base for a strap-on DIY sleeve in the most critical cases
(without interfering with the zoom ring).
The above data for the Tamron and Sigma lenses are just guesses, as I don't have access to them
(if you do, please
send me your results, which I'll publish here with due credit).
The data given online by Nikon and mindlessly repeated by reviewers (1:4.5) is clearly incorrect.
I measured the reproduction ratio of the Nikkor lens to be about 1:3.997
(the main source of error being the depth of field, as I achieved focus by moving the camera
back and forth). I simply took a sharp picture of a good ruler at longest focal distance and shortest focusing distance.
The ruler I used is a calibrated laser-imaged Cobalt Precision Rule from
Grayson Precision Technologies,
Inc. (P.O. Box 2060, Edison, NJ 08818-2060).
It was state-of-the-art back in 1995 (if I remember well, I got it for less
than $10 at a graphics-art store)...
Blowing up the image of a near-horizontal ruler,
it's fairly easy to determine the distance of two points to the nearest half-pixel
(that's an uncertainty of one quarter-pixel).
I found that the images of two points 93.5 mm apart had an horizontal separation of
5982.5 pixels and a vertical separation of 46 pixels.
that made the distance between the images nearly equal to 5982.7 pixels.
With the D5500 camera, assuming a
pixel pitch of exactly 3.91 microns,
that corresponds to a distance of 23.3924(13) mm.
This yields the measured reproduction ratio quoted above, namely:
93.5 / 23.3924 = 3.99703...
It wouldn't be prudent to compute the reproduction ratio
of a complex lens without knowing unpublished optical details
(in particular, the effective focal length varies significantly at close focusing distances).
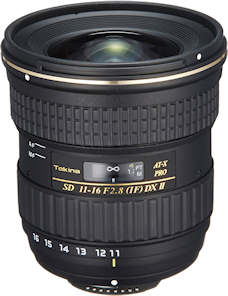
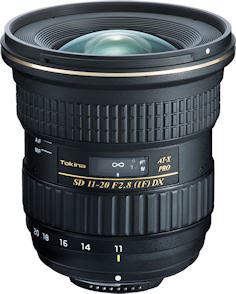
(2015-05-14) Fast wide-angle zooms from Tokina
Tokina 11-16mm f/2.8 AT-X Pro DX II (AF-S IF) ($440-$467)
Tokina 11-20mm f/2.8 AT-X Pro DX, March 2015
($523-$568)
Nov. 2007 (type II since 2012)
11-16mm f/2.8 (17-25 mm reach)
77 mm filter size. BH-77A hood.
550 g No vibration reduction (VR)
As the DX crop factor makes FX short lenses inadequate, specific DX lenses are required for
wide-angle photography.
The above two lenses compete with the Nikkor 10-24 f/3.5
(which has a wider zoom range but is significantly slower).
Shorter (expensive) zooms are available but there are slow and their usefulness is debatable.
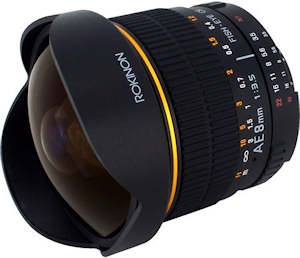
Arguably, extremely wide angles are the exclusive realm of fisheyes
with recognizable pronounced distortions.
No filters. Built-in hood.
DX reach: 12 mm (at center).
No autofocus.
This lens also comes in an inferior version without AE (auto-exposure)
whose aperture can't be controlled by the camera.
With a fisheye lens, everything looks in focus.
The old-school method is to turn the focus ring
to an estimated distance to the main subject, then frame and shoot
(at 1/15 s or faster, if handheld).
Unlike G-type lenses, this lens possesses an aperture ring which you
set to the top setting (f:22, marked in red) to let the
camera operate the iris. The camera will remind you to do so,
lest you forget.
The $0C in the above LensID should be ignored
by camera bodies (it would correspond to the aperture at the telephoto
end if this lens was a zoom).
Instead, the D5500 (and others?) mindlessly report this lens as "8mm f/3.5-1.4" [sic].
The primary function of a hood is to prevent undesirable light rays from entering the lens.
By illuminating the optics at high angles, stray light could
cause a variety of unsightly spots and blotches on the final picture.
The inside of the hood should have some good black treatment
(genuine Nikon hoods are outstanding in that respect).
A shiny hood could be worse than no hood at all by bouncing into
the optics some additional stray light.
The surface treatment on the outer part of a lens hood is utterly irrelevant.
Some generic lens hoods are available which simply
use filter threads of a given diameter.
However, dedicated bayonet hoods are generally preferable because they can be
mounted faster and do not interfere with filters (in critical cases,
stacking filters and/or such screw-in hoods can cause vignetting).
The one drawback of bayonet hoods is that they are often not
compatible with step-up rings
(the rarely-used solution is to mount a screw-type hood directly on
the larger filter, but this has other drawbacks).
For a zoom lens, a hood accomodating the shortest focal length offers
little protection in telephoto settings.
The solution is to use either several hoods or a single three-position
rubber hood. Unfortunately, rubber hoods are not commercially
available in bayonet mount
(you can make one by fitting the front part of a rubber hood to
a sawed-off bayonet hood, but this is neither cheap nor easy to do).
With bayonet hoods, the main difficulty occurs at the time of purchase
(especially when mail-ordering).
Nikon does offers many models of lens hoods but little or no guidance
concerning their respective compatibilities with various lenses.
Firstly, the size of the bayonet on the hood must match what's
on the lens. Secondly, the shading part must not be
so narrow as to cause vignetting or so wide as to offer little protection.
Lens Hoods Why, When, and How to Use Them.
by Phil Steele.
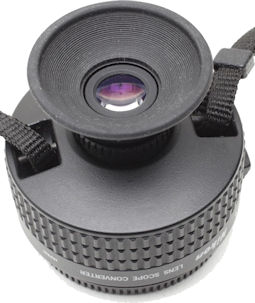
(2017-01-30) Scope Converter : Erecting prism with 10 mm eyepiece.
A lens of focal length L mm becomes a scope of L/10 magnification.
The magnifying power reveals lens aberrations that would remain undetected in
most photographic applications.
With lenses f/3.5 or brighter, the exit pupil is 2.8 mm.
The Nikon original has been out of production for many years and now sells at a premium on eBay
(early in 2017, I got a nice copy at auction, unchallenged, for $150 + shipping; almost a bargain).
As this Nikon scope-converter was designed before the introduction of G-lenses
(which don't have an aperture ring) it can't control the iris of
a G-lens, whose aperture must thus be kept open by a
DIY
plastic tab.
Fortunately, no such DIY gizmo is needed for the Nikkor 200-500, which
is converted into a fantastic 20x-50x scope with a 1.75 mm exit pupil.
(It seems that all other E-lenses also have their diaphragms fully-open by default,
making them directly usable with the Nikon scope-converter.)
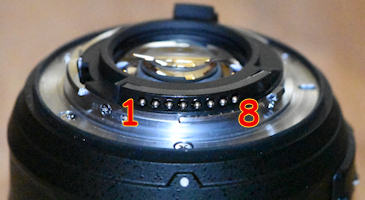
(2015-06-14) Nikon's F-mount pinout and electrical protocol:
Electrical connections between lenses and Nikon camera bodies.
Recent Nikon bodies have 10 electrical lens contacts (the D80 only had 7).
Most lenses have 8 pins or fewer
(forsaking pins 9 and 10). Pin 4 is aligned with the central dot.
Pins 1, 2, 3, 4 and 7 are required for the basic serial communications
supported by all Nikon-compatible digital lenses.
Pins 2 and 3 are open-collector bus lines (10k pull-up resistors inside camera)
Pin
Name
Function / Description
A = 1
Vcc
+5 V regulated power (from camera) for digital circuitry.
B = 2
H/S
Handshake. Can be asserted low by either device.
C = 3
SIO
Serial I/O data bus line (open collector).
D = 4
SCK
Serial (asynchronous) clock, from camera body.
E = 5
AF feedback from lens (50k pull-up resistor in camera)
F = 6
LBAT
+6.2 V (switchable?) power source for lens motor(s).
G = 7
LGND
Logical ground (0 V).
H = 8
HGND
High-current ground (negative return path).
9
Reserved for teleconverter use.
10
Reserved for teleconverter use.
The exact function of pins 9 and 10 is still a mystery to me.
Those contacts are not present on the throat of any Nikon body.
They appear only on the throats of teleconverters and on the bayonets of lenses
compatible with teleconverters. Surprisingly enough, pins 9 and 10 are also present on the bayonets
of teleconverters (in spite of the fact that current teleconverters are not supposed to be stackable).
I've never experimented electrically with teleconverters but
I was told that what
the CPU of a teleconter does is just tell compatible lenses the value of its ratio
(1.4, 1.6, 1.7 or 2.0) using pins 5, 9 and 10. It's then
up to the CPU of the lens to use that information to communicate with the camera.
Reportedly, in a teleconverter, all 10 pins on the throat side are tied directly
to their respective counterparts on the bayonet side.
The 5 highlighted pins (1,2,3,4,7) implement the
communication system described in several arcane Nikon patents:
This is a 3-wire synchronous serial interface,
somewhat similar to a 2-wire I2C bus,
but with a separate handshake line (on pin 2)
and a 5 ms timeout.
Ground is on pin 7. The camera body provides a +5V regulated voltage on pin 1
and acts as bus master by controlling the clock (SCK) on pin 4.
The other two pins are open-collector bidirectional bus lines with pull-up resistors located on
the camera side (10 kW on my D5500).
The functions of the other pins may be negotiated between lens and camera,
using the communication protocol so implemented.
The camera tries to communicate using a 156 kHz clock rate
and falls back to 96 kHz if the lens doesn't respond properly.
Communications start with the camera asserting H/S (low) for 1.6 ms.
Some command bytes (hexadecimal) in Nikon's camera/lens protocol :
Originally, a lens which didn't recognize a command was supposed to send back
a single #$FF byte. Newer lenses will timeout instead.
(The earlier protocol seems better to me.)
(2015-06-14) LensID and electronic signatures of lenses:
Rottmerhusen's database of Nikon-compatible F-Mount digital lenses.
Nikkor lenses and third-party F-mount lenses with a CPU chip
(Central Processing Unit)
have a stored "LensID" consisting of one or two bytes.
To reliably identify third-party lenses,
Robert Rottmerhusen
has combined this with other fixed data provided by the lens
(related mostly to focal length and aperture characteristics) to form an 8-byte
Extended
LensID.
He has compiled a database of about 500 lenses which
some
EXIF readers are using to identify the lens in the metadata attached to a
JPEG picture.
At this writing, this method results in only seven ambiguities, mostly
for different updates of the same lens.
Only three of them are significant:
# 2F 48 30 44 24 24 29 02:  Nikon AF Zoom-Nikkor 20-35mm f/2.8D IF
# 2F 48 30 44 24 24 29 02:  Tokina AT-X 235 AF PRO (AF 20-35mm f/2.8)
#
# 32 54 6A 6A 24 24 35 02:  Nikon AF Micro-Nikkor 105mm f/2.8D
# 32 54 6A 6A 24 24 35 02:  Sigma Macro 105mm F2.8 EX DG
#
# 7A 3C 1F 37 30 30 7E 06:  Nikon AF-S DX Zoom-Nikkor 12-24mm f/4G IF-ED
# 7A 3C 1F 37 30 30 7E 06:  Tokina AT-X 124 AF PRO DX II (AF 12-24mm f/4)
Rottmerhusen's identifiers are
known
to consist of the following bytes:
Single-byte legacy LensID (possibly a misappropriated Nikkor ID).
Nominal range of apertures (unit = 1/12 of an f-stop).
Rottmerhusen
says that all but the last byte (lens type)
appear at addresses 12-18 in the
EXIF "makernote tag" of an unmodified JPEG picture.
For a prime lens (characterized by identical focal lengths at the
wide end and the long end) the maximum aperture at long end
should be ignored (in at least one third-party lens
this is definitely junk data).
At least one Nikon body (the D5500) reports that piece of data on the
back of the camera as if it was meaningful!
However, there's no evidence that this junk data for a prime lens is actually
used anywhere.
Single-byte encoding of focal length :
The encoding used for focal lengths in the above is a logarithmic scale.
Like any industrial sizes, focal lengths congregate around geometric progressions
of preferred numbers,
by design or necessity.
For historical lenses, the original coarse progression of focal lengths
followed the photographic tradition of doubling every 3 steps.
Lineups were then refined as needed by designing new lenses at the
geometric mean of existing focal lengths.
In the grand scheme of things, we ended up with elements of a
geometric progression where doubling occurs after 24 tiny steps:
Relation between the focal length
(f) and its single-byte modulus (m)
f = 2 m/24 u
where u = 4.953 mm = 0.195'' or u = 4.9459 mm (see below).
Conversely, m = 24 lg (f / u).
For example, if f is 35 mm, then m is:
Rounded to the nearest integer, that's 68, or $44 in hexadecimal.
This first value of u
can be reversed-engineered as the middle of the interval (from 4.946 to 4.960 mm)
which makes this type of conversion perfectly correct in 90% of the 50 unambiguous cases
in Rottmerhusen's database
(the rest being construed as rounding errors).
u is also the only length in that interval to be a whole number of
thou.
The converse operation is more delicate, since a rounded logarithm may not be sufficient
to retrieve the original number.
In our example, 4.593 268/24 is only 32.735
which isn't an acceptable approximation of 35 mm, unless you know
what the aforementioned list of preferred values really is...
In some cases, a manufacturer may know more about the focal length of a lens than
what's reported as a round number of millimeters and will adjust the code accordingly
(for example, codes $10 and $11 are both reported as 8 mm and the manufacturer
may use the former or the latter depending on whether the actual focal length is slightly
less of slightly more than 8 mm).
More annoyingly, although codes 47 and 49 ($2F and $31)
are respectively reported as 19 mm and 20 mm,
the middle code (48 = $30) can be reported as either
(dubiously so for a focal length not exceeding 19.5 mm).
That particular case turns out to be the most critical of all.
It can only be accommodated by adjusting the base unit u to satisfy the equation:
24 lg (19.5 / u) > 47.5 which means u < 4.94590885...
Now, with the value u = 4.9459 mm, we find that
the database becomes completely correct if we just assume that manufacturers
have reported an hexadecimal code for some actual focal length which is
legitimately rounded to the advertised value in mm.
Here's the complete list of the cases which are consistent with that rule
although the advertised focal length (in mm) doesn't fall within the range
covered by the listed code.
Advertised focal lengths whose codes imply slightly different actual values :
This does justifies Rottmerhusen's approach of fully identifying a lens
before reporting its focal length!
(2015-06-20) EXIF data (Exchangeable Image File Format)
The hidden data attached to every JPEG image made by your camera...
The EXIF metadata attached to digital pictures contains information formatted
according to an evolving standard. The constant upgrades are difficult to follow.
If that wasn't bad enough, it also contains a "MakerNote" part formatted differently
by different camera makers from one of their cameras to the next.
Most camera manufacturers do not bother to publish their own format.
Nikon is just as bad as the others with that regard.
Most of what's known had to be reversed-engineered!


 The magnifying power reveals lens aberrations that would remain undetected in
most photographic applications.
With lenses f/3.5 or brighter, the exit pupil is 2.8 mm.
The magnifying power reveals lens aberrations that would remain undetected in
most photographic applications.
With lenses f/3.5 or brighter, the exit pupil is 2.8 mm.